
Vivo Y3 USB Driver Latest -update
On the off chance that you are a proprietor of Vivo Y3 and paying special attention to usb drivers to associate your Android gadget with the Windows PC, then, at that point, you have arrived perfectly positioned. Download the Vivo Y3 USB driver from here, introduce it to your PC and associate your gadget with a PC or PC effectively.
Here, we have given two usb drivers to your Vivo Y3 Android gadget.
 |
| Vivo Y3 USB Driver Latest -update |
Download Vivo Y3 USB Driver Latest -update
USB Driver Type: Mediatek Driver
USB Driver Purpose: For flashing Stock firmware on your device.
File Size: 10 MB
USB Driver Type: ADB Driver
USB Driver Purpose: For connecting your device to a computer.
File Size: 8.3 MB
Moves toward Introducing Vivo Y3 Mediatek Driver on PC
Stage 1: To get everything rolling, download the MediaTek driver and concentrate on your work area.

Mediatek Driver
Stage 2: Presently, open the driver envelope and snap "Introduce Drivers" to start the establishment interaction.

Introduce Drivers
Stage 3: In the Arrangement Order Brief Window, press any key from the console to begin the establishment cycle.

Arrangement Discourse Box
Stage 4: You will see the Driver Establishment Finished message, after effective establishment of the MediaTek Driver on your Windows PC.
Stage 5: Presently, press any key from the console to leave the Arrangement Window.

Establishment Finished
Stage 6: To get done, restart your PC.
That is all there is to it. You have effectively introduced the MediaTek Driver on your Windows PC.
Moves toward Introducing Vivo Y3 ADB Driver on PC
Video Instructional exercise
On the off chance that you could do without this video instructional exercise or, on the other hand, in the event that you might want to get more guidelines, read.
Stage 1: To begin, download the ADB driver and concentrate on your work area.

adb-driver
Stage 2: Presently, open Gadget Chief > Activity > Add inheritance equipment.
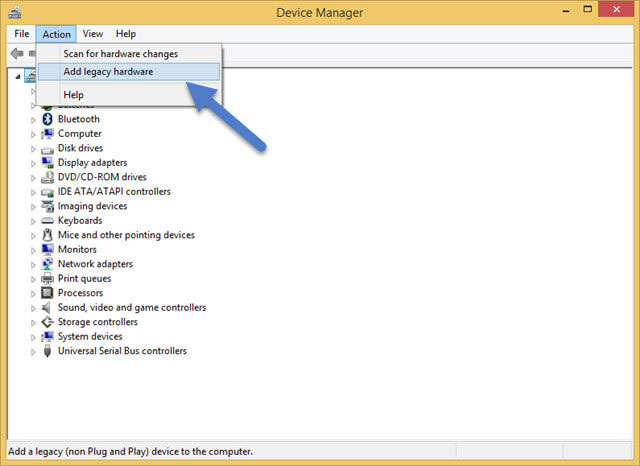
add-inheritance equipment
Stage 3: Next, click "Next" in the Add heritage equipment wizard.

add-equipment wizard
Stage 4: Presently pick "Introduce the equipment that I physically select from the rundown (Progressed)" and click "Next".

Introducing equipment from-list
Stage 5: Once finished, pick "Show all gadgets", click "Next" and select the removed document physically from your PC.

show-all-gadgets
Stage 6: Presently to begin introducing your new equipment, click "Next" once more.

Introducing android-adb-interface
Stage 7: Snap "Introduce" in the Windows security brief window.

Windows-security
Stage 8: Next, click "Finish" to finish establishment.

nvidia-driver-introduced
That is all there is to it. Presently you have effectively completed the process of introducing drivers on your PC. Assuming that you experience any issues while following this instructional exercise, do tell me through your remarks.